Honeywell CT87N The Round Non Programmable Thermostat Owner’s Manual


CT87N/CT87K • Owner's Manual
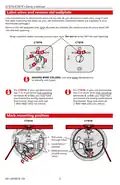
Label wires and remove old wallplate
Use a screwdriver to disconnect wires one by one. As you disconnect each wire, wrap it with
the label matching the letter on your old thermostat. (Adhesive labels are supplied in your
thermostat package.)
Remove the old wallplate only after all wires are labeled. Be careful not to let loose wires fall
into the wall opening.
Wrap supplied labels securely around each wire. Do not let wires fall into wall opening!
CT87N
CT87K
IGNORE WIRE COLORS: Use only letter designations
to identify wire types.
For CT87N: If your old thermostat
For CT87K: If your old thermostat
has 4 or more wires (not counting
terminals C or C1), you may have
purchased the wrong replacement
thermostat. Stop now and call
1-800-468-1502 for advice.
has 7 or more wires (not counting
terminals C or C1), you may have
purchased the wrong replacement
thermostat. Stop now and call
1-800-468-1502 for advice.
Mark mounting position
CT87N
CT87K
1. Pull wires
through base.
R
2. Level base if
desired.
W
Y
3. Mark positions
of both screw
holes.
69-1959EFS—04
2
| General | Details |
|---|---|
| Name | Honeywell CT87N The Round Non Programmable Thermostat Owner’s Manual |
| Make | Honeywell |
| Language | English |
| Filetype | PDF (Download) |
| File size | 3.3 MB |


Honeywell T6 Pro Programmable Thermostat User Manual

Honeywell D1-528 Direct Thermostat Installation Guide

Honeywell FocusPRO P200 Programmable Thermostat User Guide

Honeywell RCHT8610WF Series Smart Thermostat Installation Guide

Honeywell T9 Smart Thermostat Installation Guide

Honeywell TH2320WF4011 FocusPRO Smart S200 Series Thermostat User Guide

Honeywell TL116A Thermostat Installation Guide

T10 Pro Smart Thermostat with Redlink Room Sensor

Honeywell TH6320WF2003 Lyric T6 Pro Wi-Fi Programmable Thermostat User Guide

Honeywell RTH9580 Wi-Fi Color Touchscreen Programmable Thermostat User Guide


ENGO CONTROLS E10W230WIFI WiFi Temperature Thermostat User Guide

Honeywell TH6100AF2004 T6 Hydronic Programmable Thermostat User Manual

PNi CT36PRO Smart Thermostat Instruction Manual

GLOBAL CEG Series Convector with Thermostat Instruction Manual

BEOK BOT306RF-WIFI Thermostat Owner’s Manual

BEOK BOT-R6X Wireless Gas Boiler Thermostat User Manual

Hycontrol HY08AC Central Air Conditioning Thermostat Instruction Manual

Danfoss AN527449268065en-000101 Thermostat Instruction Manual
STELPRO UT202NP Series Non-Programmable Electric Thermostat Owner’s Manual

resideo P200 Series Focus PRO Thermostat User Guide