BEOK TGM50 Thermostat User Guide


TGM50 THERMOSTAT
USER GUIDE
Electrical Specifications
Mounting Steps
Advanced Option Setting
In the POWER OFF state, long press the
5 seconds to enter the advanced option setting.
key and
key for
M
1. Temperature Sensor : NTC
2. Temperature accuracy : 土1°C
3. Display screen: LCD
M
keyto adjust options. Press
Press the
or
option setting mode.
key to enter the next option, then press the key
key to exit the advanced
4. Working environment: -5~50°C
5. Self-consumption power: <1W
6. Temperature setting : 5~60° C
7. Display range: 0~51°C .
8. Load current: water heater 3A
electric heater 16A
The default value of the calibration room
temperature is -2 °C. Press the up or down
key to adjust the range from 9.9 °C to -9.9 °C.
Temperature
compensation
2. Separate the power supply
from the control board cable
1. Connect the power box
according to the wiring diagram
01
The temperature sensor selection defaults to
IN. Press the up key or down key to adjust it
respectively as IN internal sensor selection.
ALL means all internal sensors are selected;
OUT means external sensors are set.
gas boiler 3A
9. Voltage : AC100- 240V, 50/ 60Hz
02 Sensor selection
The limit temperature value is 60°C by default.
Press the up or down key to adjust the range
from 35°C to 60°C .
Limit temperature
03
value modification
User Instructions
The default setting temperature accuracy is
1°C; press the up or down key to adjust the
range from 0.5°C to 10°C.
4. Connect the power board to the
control board line, and align the
buckle at 30 degrees to complete
the installation.
3. Screw the power supply into
the boxof 86
Temperature
04
1. Read this manual carefully. A general operation may damage the
product or cause a dangerous situation.
accuracy
The default setting for antifreeze function is
OFF; press the up key to turn on the function.
ATT: if Antifreeze function is turned on,
when you turn off the thermostat, the room
temperature and power key is still displayed.
2.The installation personnel must be well -trained and experienced
service technicians.
Antifreeze
function
Icon Description
05
3. After the installation is complete, please close this manual carefully
and operate this product following the user guide.
Open window
detection
Leave mode
WIFI icon
Auto mode
Manual mode
Rest day selection
5: Two-day weekend 6: Single day off
7: No rest OFF: Turn off programming
Note: There is a risk of electric shock or equipment damage.
(optional) and
closing weekly
program
06
07
Locking icon
Welcome
Thank you for your trust and support!
Set the main and auxiliary reverse to 00 by
default. Press the up or down key to adjust 00
main reverse , and 01 indicates the auxiliary
reverse.
ATT: it is not recommended to adjust without
professional guidance.
Room
Wiring Diagram
We have adopted advanced technology and perfect craftsmanship so
that your new thermostat will provide you with a suitable temperature
environment every day in the future. It makes your life more pleasant
and artistic and making your living environment more fashionable
aesthetic.
For detailed instructions on installing and using this thermostat,
please read this manual carefully.
Please get in touch with a professional to install the thermostat for you.
Besides, please install and use this product within the scope of the law.
temperature /
Setting
temperature
Main and auxiliary
reverse selection
(optional)
Heating icon
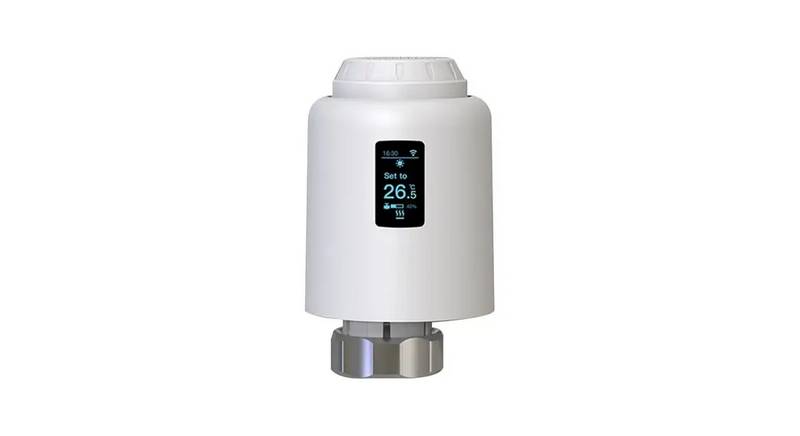
TGM50-WP
AC100-240V
Button icon
M
00: Turn off the backlight
Standby backlight 01: Brightness always on (Low)
TGM50-WP,
for water heating
08
09
brightness
02: Brightness always on (Mid)
03: Brightness always on (High)
The default setting is 03
Operation Guide
1. Power on/off: press the
key to turn on/of the thermostat.
Set the upper limit of the temperature to 60°C;
press the up or down key to adjust the range
from 15°C to 95°C.
Set temperature
limit
2. Press the
key to switch between Manual and Leave modes.
M
3. Simultaneously press and hold the
seconds to add or cancel the child lock.
and
keys for 5
ON: Turn on the sound
OFF: Turn off the sound
10 Sound
Application
TGM50-EP
AC100-240V
ON: Turn on the window opening detection
OFF: Turn off the window opening detection
The default setting is ON.
4. WIFI link: When the thermostat is turned on, press and hold the
button for five seconds, the Wi-Fi icon flashes on the thermostat
display, and the thermostat enters the Wi-Fi configuration state.
The intelligent digital humidity controller is a floor heating
system suitable for room temperature control and household
temperature control. It controls the operating status of the floor
heating equipment by sensing the comparison between the ambient
temperature and the set temperature. While improving comfort, it
achieves the purpose of energy saving.
The digital thermostat adopts microcomputer control technology and
has an elegant design, and is easy to use. Moreover, it has manual
and automatic functions, programmable functions, and state memory
functions.
TGM50-EP,
for electric heating
ATT:
When the window opening detection is
turned on, if the room temperature drops by
6 °C within 4 minutes, then window opening
mode will be triggered. At this time, the
thermostat will stop heating, and the window
opening detection icon is displayed.
Time Programming Instructions
Window opening
detection
11
After the window opening mode is triggered, in
the following three conditions, the mode will be
exited:
1. the room temperature rises by 3 °C
2. 48 minutes after triggering
3. manual
TGM50-WPB
AC100-240V
TGM50-WPB,
for gas boiler
Product Package
0: memory function
1: Turn on after turning on the power
2:Turn off after turning on the power
Power outage
memory function
1 pc
1 pc
1 pc
2 pcs
1 pc
12
13
Thermostat host
Guide/manual
Certificate of conformity
Screw
External sensor (optional)
Set to restore factory settings The default
display is "-" press the up key to display "--_",
and then press the enter key to restore the
factory settings.
Reset
Note: WP for water heating; EP for electric heating; WPB for gas boiler

| General | Details |
|---|---|
| Name | BEOK TGM50 Thermostat User Guide |
| Make | BEOK |
| Language | English |
| Filetype | PDF (Download) |
| File size | 0.91 MB |


BEOK Color TFT-LCD Heating Thermostat User Manual

BEOK TDS21WIFI-AC Fan Coil Thermostat Instruction Manual

BEOK TGR85-EP Underfloor Heating Thermostat User Guide

BEOK TDR89 Zigbee Room Thermostat User Guide

BEOK BOT-R7X Wireless Gas Boiler Heating Thermostat Instruction Manual

BEOK TDS23 Wi-Fi Fan Coil Thermostat Instruction Manual

BEOK TGP53 China Piano Buttons Underfloor Heating Thermostat User Guide

beok TGW60 Thermostat User Guide

BEOK TS4 Series Wi-Fi Touch Screen Thermostat User Manual

BEOK TGP53 Wifi Thermostat User Guide

BEOK TGM50 Thermostat User Guide Overview
Summary of Contents
- Page 1: TGM50 thermostat user guide Electrical specifications include temperature sensor type, accuracy, display screen, working environment, self-consumption power, and load current. Mounting steps involve connecting the power box according to the wiring diagram and completing the installation by aligning the buckle. Advanced option setting can be accessed by pressing the power key for 5 seconds in the power-off state. Temperature compensation allows adjustment of the calibration room temperature from 9.9 °C to -9.9 °C. The default antifreeze function is off, but it can be turned on using the up key. User instructions emphasize careful reading of the manual to avoid damage or dangerous situations. The thermostat features a window opening detection mode that stops heating when the room temperature drops significantly. The intelligent digital humidity controller is designed for efficient room temperature control and energy saving. The product package includes the thermostat host, guide/manual, certificate of conformity, screws, and an optional external sensor. Factory settings can be restored by pressing the up key to display the reset option and then confirming the action.
- Page 2: About Wi-Fi Connection When the thermostat is turned on, press and hold the up button for 5 seconds to enter code matching. The system automatically determines the current country/region, or you can manually select it. Enter your phone number or email address and click Get the Verification Code. If the network configuration fails, the app will display an error page with options to retry or seek help. Before using the Wi-Fi temperature controller for the first time, set the Wi-Fi value number and configuration via your smartphone or tablet. Confirm whether the thermostat enters the code matching state if the connection fails. In the specific network configuration mode, select the Wi-Fi that can connect to the Internet and enter the password. Turn on the mobile phone's Bluetooth and enter the Tuya APP to add the device. If you do not have an app account, you can register or log in via SMS verification code. Search for devices and add widgets as prompted on the phone page.

GROHE 26984001 Vitalio Comfort 250 Shower System with Bath Thermostat Installation Guide
tuya TRV603 Smart WiFi Radiator Thermostat Instruction Manual

DIMPLEX ML2TA 2KW Convector Heater With Thermostat Instruction Manual

ALARM ADC-T25 Smart Thermostat Installation Guide

sauermann TST Electronic Thermostat User Guide

Aprilaire S86N MUPR Multi Stage Universal Thermostat Owner’s Manual

COLDBUSTER MWD5 Programmable Thermostat User Manual

Danfoss 015G3090 React Radiator Thermostat Installation Guide

VILPE WIVE 100 Intake Vent Plus Thermostat Installation Guide

PELICAN TC4 Commercial Connected Thermostat Installation Guide