BEOK TDR89 Wifi Heating Thermostat Instruction Manual

TDR89 WIFI HEATING THERMOSTAT
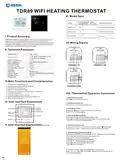
VI. Model Spec
Current
Loading
Week
Program
Controlled Objects
For electric heating appliances
For water heating appliances
For gas boiler
16A
TDR89WIFI-EP
3A
3A
TDR89WIFI-WP
TDR89WIFI-WPB
I. Product Summary:
TDR89 WiFi Heating Thermostat is WiFi touch screen thermostat with
phone control. It is applied to temperature control of industrial,
commercial and domestic room, and start of control heating appliances,
especially floor heating systems. It can be controlled by phone. Phone
systems are IOS and Android system optional.
VII.Wiring Digram
II. Technical Parameter:
Power Supply
Current Load
100 ~ 240V
≤3A(water heating/gas boiler)
≤16A(electric heating)
Power Consumption
External Material
Sensing Element
Set Temp. Range
<1W
PC+ABS (flame retardant)
NTC
TDR89WIFI-EP
TDR89WIFI-WP
5-95℃
5-60℃
Floor Set Temp. Range
Accuracy
±1℃
86x90x14mm
Dimension
Ambient Temp.
Storage Temp.
Timing Error
0-45℃,5-95%RH(Non-condensing)
-5~55℃
<1%
III.Main Functions and Characteristics
1. WIFI for Android & Apple iOS
2. Large screen display and touch button
TDR89WIFI-WPB
3. Power-off memory function
4. Real-time data save function
5. 5+2 or 6+1or 7days six periods program schedule
6. Anti-freezing function
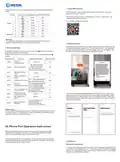
VIII. Thermostat Operation Instruction
7. 3 sensor modes can be setting
8. Selectable 80mmx80mm European hidden box.
9. With child lock function
1. Setting Power on/off
Press to turn on/off the power.
IV. User Interface Explanation
2. Setting Temperature
Press “+” or “-” to set the temperature.
3. Setting the Clock
Long press
and “+” to set minute, hour and week.
Press “+” or “-” for adjusting.
4. Setting the Manual Mode.
Manual mode means non-programmable mode.
Press
then
will display in the screen, it is in manual mode.
Press “+” or “-” to set the temperature.
V. User Interface Explanation(Phone Port)
5. Setting the Child Lock
Long press “+” and “-” to enter into child lock mode,
will display.
Long press “+” and “-” again, the child lock will be disappeared.
6. Setting the Programmable Mode.
Press and hold
into programmable mode. 12345 and time will display.
12345 display in the position of week means 5+2;
Press “+” or “-” to change the time.
Press to do the temperature adjustment.
Press “+” or “-” to change the temperature;
Press to do the next period adjustment.
Press
to exit and save.
If you want to make temporary adjustment in any period,
press “+” or “-”, then
confirm automatically.
will display. When finish the setting, all will

| General | Details |
|---|---|
| Name | BEOK TDR89 Wifi Heating Thermostat Instruction Manual |
| Make | BEOK |
| Language | English |
| Filetype | PDF (Download) |
| File size | 0.27 MB |


BEOK Color TFT-LCD Heating Thermostat User Manual

BEOK TDS21WIFI-AC Fan Coil Thermostat Instruction Manual

BEOK TGR85-EP Underfloor Heating Thermostat User Guide

BEOK TDR89 Zigbee Room Thermostat User Guide

BEOK BOT-R7X Wireless Gas Boiler Heating Thermostat Instruction Manual

BEOK TDS23 Wi-Fi Fan Coil Thermostat Instruction Manual

BEOK TGP53 China Piano Buttons Underfloor Heating Thermostat User Guide

beok TGW60 Thermostat User Guide

BEOK TS4 Series Wi-Fi Touch Screen Thermostat User Manual

BEOK TGP53 Wifi Thermostat User Guide

BEOK TDR89 Wifi Heating Thermostat Instruction Manual Overview
Summary of Contents
- Page 1: TDR89 WiFi Heating Thermostat is a WiFi touch screen thermostat with phone control. It is applied to temperature control of industrial, commercial, and domestic rooms, especially for floor heating systems. Power supply ranges from 100 to 240V with a current load of up to 16A for electric heating and 3A for water heating or gas boilers. The thermostat features a large screen display and touch button, power-off memory function, and real-time data save function. It supports a programmable schedule of 5+2, 6+1, or 7 days with six periods. The device includes a child lock function and three sensor modes that can be set. Manual mode allows for non-programmable temperature adjustments. The user interface includes settings for power on/off, temperature adjustment, clock setting, and programmable mode. The thermostat has a dimension of 86x90x14mm and operates within an ambient temperature range of 0-45°C. It is designed for easy installation in an 80mmx80mm European hidden box. The accuracy of the temperature setting is ±1°C.
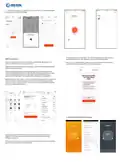
- Page 2: Install the app on your phone by searching for Tuya Smart in the App Store for iOS or Google Play for Android. You can also scan a code to download the app. If you do not have an app account, you can register or log in via SMS verification code. To register, agree to the Tuya Smart Platform Privacy Policy and enter your mobile phone number or email address to receive a verification code. In power-off state, press specific keys for 5 seconds to enter advanced option settings. Adjust settings using the provided options for temperature compensation and sensor selection. The system automatically determines the current country/region, but you can select it manually. To add a device, turn on Bluetooth, enter the Tuya app, and click “Add Device” to follow the prompts. The thermostat will enter a code state when the Wi-Fi icon flashes after pressing the + button for 5 seconds. Ensure the correct sensor mode is selected to avoid errors displayed on the LCD screen.
- Page 3: Automatic discovery allows you to search for devices and add widgets as prompted on the phone page. If the distribution network fails, the app will display an error page, allowing you to add or view help again. When the thermostat is turned on, press and hold the button for 5 seconds to display the connection status. If the connection fails, confirm whether the temperature control device has entered the code matching state. The WIFI icon will flash slowly when the thermostat is in code matching status. Find the temperature control product in the small household appliances section. In network configuration mode, select the WIFI that can connect to the Internet and enter the password. Follow the prompts in the app to complete the network configuration process. The app interface will display the network configuration status and allow modifications to the device name and room location.
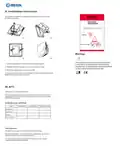
- Page 4: Installation instruction for the product is provided. The product is suitable for standard 80*80mm wall box and 60 mm European round box. Connect the power box according to the wiring diagram. Separate the power supply from the control board cable. Screw the power supply into the box of 86. Connect the power board to the board line, and align the buckle at 30 degrees to complete the installation. The package includes a thermostat, user manual, screws, and an external sensor. The warranty is valid for 24 months from the sales day. Quality issues during the warranty will be fixed or replaced for free after testing. Charges will apply for after-sales service if it is not a quality problem or beyond the warranty time.

htc HYT001 WIFI Digital Heating Thermostat User Manual

THE HEATING COMPANY TR220 WiFi Thermostat User Manual

Beca BHT-008 Heating Thermostat User Guide

VIMAR 02971 Smart Automation Rotary Dial Thermostat Instruction Manual

tado 104388 Smart Thermostat

Honeywell Home X8S Smart Thermostat User Guide

Honeywell VisionPRO TH8000 Series Touchscreen Programmable Thermostat Instruction Manual

DELTA DORE TYBOX 1117 Programmable Thermostat User Guide

ZigBee WiFi Series Water Heating Thermostat User Guide

LUX PSP511A Series Programmable 5-2 Thermostat Instruction Manual