
Smartica HY608W 3A Wifi Digital Heating Thermostat User Manual



WIFI Digital Heating ThermostatUser Manual
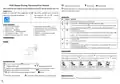
Activate window function
Room temp
Setting temp
Many thanks for your selection of our products and services, and also for your trust and
support to us.
:Cooling mode,this icon is always displayed when switching to cooling mode and flashes
when the cooling load is output
Search for "Smart life" from google play or
App store to Download the Wifi App
Turn on the thermostat, press and hold the
key combination “ ” and “
WIFI distribution network icon
”
Activate
Operation key
NO symbols represent
Turn ON/OFF: short press to turn on/ turn off
A
1. Short press
to switch automatic mode and manual mode
B
C
Product Specifications
2.Turn on thermostat, long press for 3-5 seconds to enter into programmable setting
☆ Power: 90-240Vac 50/60Hz
☆ Range of temperature display::1~70°C
☆ Insulating condition: Normal environment
☆ Running program: Set per 1 week as a cycle
☆ Output: Switch relay
3. Turn off thermostat, long press for 3-5 seconds to enter into advanceoption A
☆ Display accuracy::0.5°C
1. Confirm key
2. short pressit to set time
☆ Probe sensor::NTC(10k)1%
☆ Contact capacity::3A/(WW);16A/(WE)
☆ Limit temperature range::1~70°C
☆ Range of temperature adjustment::5~35°C
3. Turn on thermostat,long press it for 3-5seconds to holiday mode setting. Appear OFF,
☆ Installation: recessed type (in the wall)
☆ Size(mm):86*86*10
press
or change to ON,then press
to confirm opening holiday mode
4. Turn off thermostat,long press it for 3-5s to enter into advanced option B
1. Decrease key
Wiring Diagram
D
E
2. Long press to lock /unlock
Displays
1. Increase key
2. Long press to inquire external sensor temperature ( only available for BN item select
N3 in the advance option B)
3. In the program model, press
or enter to temporary manual mode
Programmable
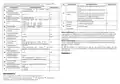
5+2 (factory default),6+1 and 7 models 6 times period setting for user choose. In the advanced options
choose model of you need, under power on state, long press for 3-5 seconds enter into programming
mode setting, then short press
choose: hour,minute, time period, and press
and
to adjust
data, finished setting, about 10 seconds will automatic save and exist.
Description of icon
Auto mode: run preset program Manual mode
Programming mode
Clock
Temporary manual mode
Wake up
Leave home Back home
Leave home Back home
Sleep
Holiday mode, Holiday days and temperature can be set to run in countdown mode
11:30
13:30
17:00
22:00
6:00 20℃ 8:00 15℃
15℃
15℃
15℃
15℃
Heating,,icon disappears to stop heating
External NTC sensor
Child lock
WIFI connection, flashing EZ distribution mode
Wifi status: Disconnection
Cloud icon: flashing AP distribution network mode
Advanced option A
Power off state, long press
for 3-5 seconds to access advanced option A.


| General | Details |
|---|---|
| Name | Smartica HY608W 3A Wifi Digital Heating Thermostat User Manual |
| Make | Smartica |
| Language | English |
| Filetype | PDF (Download) |
| File size | 0.22 MB |
 (1 votes, average: 5.00 out of 5)
 Loading...

Smartica HY607B 3A Zig Bee Thermostat User Manual

Smartica HY608W Manual: Questions and Answers
Can I use the Smartica HY608W with an external temperature sensor?
Yes. In advanced option B, select sensor option N3 to enable internal sensor control with external sensor limit temperature monitoring. User Manual, p. 2
What do the buttons A through E do on the Smartica HY608W?
| Button | Function |
|---|---|
| A | Turn on/off with short press |
| B | Switch between automatic and manual modes; enter programmable settings |
| C | Confirm key; set time; access holiday mode and advanced options |
| D | Decrease key; long press to lock/unlock |
| E | Increase key; query external sensor temperature; enter temporary manual mode |
What does the snowflake icon on the Smartica HY608W display mean?
Heating is active. The icon disappears when heating stops. User Manual, p. 1
What does the E1 or E2 error message mean on the Smartica HY608W?
A sensor fault has occurred. Verify that the correct internal or external sensor working mode is selected. The thermostat stops heating until the fault is resolved. User Manual, p. 2

SALUS iT500 Internet Thermostat Installation Guide

TFC Group OP-WFSTAT Wi-Fi Programmable Thermostat User Guide

stelpro STZB402+ ELECTRONIC THERMOSTAT FOR THE SMART HOME User Guide

IHAVC CONTROLS T-32-P Universal Thermostat Instruction Manual

BOSCH BCC110 Thermostat User Guide

Danfoss Icon2 24V RT Room Thermostat Installation Guide

Haswill Electronics STC-8080H Thermostat User Guide

BEOK TDS23 Wi-Fi Fan Coil Thermostat Instruction Manual

ENGO CONTROLS FAN-24W 24V Fan Coil Thermostat User Guide

Honeywell Home RTH9585WF Smart Color Touchscreen Programmable Thermostat User Guide