NOBO NTL4S 07 NTL Heater with Thermostat Instruction Manual


INSTRUCTION MANUAL
Nobo NTL Heater with Thermostat
Models: NTL4S 07 | NTL4S 10 | NTL4S 12
NTL4S 15 | NTL4S 20 | NTL4S 24
For domestic household use only.
300002200 Issue 1

| General | Details |
|---|---|
| Name | NOBO NTL4S 07 NTL Heater with Thermostat Instruction Manual |
| Make | NOBO |
| Language | English |
| Filetype | PDF (Download) |
| File size | 0.2 MB |


NOBO NCU-2Te High Precision Thermostat Instruction Manual

NOBO NTL4S 07 NTL Heater with Thermostat Instruction Manual Overview
Summary of Contents
- Page 1: Instruction manual for Nobo NTL heater with thermostat. Models include NTL4S 07, NTL4S 10, NTL4S 12, NTL4S 15, NTL4S 20, and NTL4S 24. Designed for domestic household use only. Document version is 300002200 Issue 1.
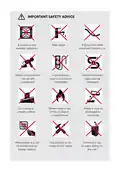
- Page 2: Important safety advice should be read carefully and retained for future reference. Failure to follow these instructions may cause injury and/or damage and may invalidate your warranty. Basic precautions should always be followed to reduce the risk of fire, electrical shock, and injury to persons. The wall bracket supplied with the heater must be used. The heater should be installed out of reach from people in the shower or bath. This heater is suitable for normal domestic household purposes and should not be used in any other type of environment. Products should only be used in the country where they were purchased. Do not use outdoors or install if the product is damaged. The use of an extension lead or multi-plug adaptor is not advised when connecting this product to the mains. Do not locate the appliance immediately below a fixed socket outlet or connection box.
- Page 3: Warning - the surfaces on this heater can be hot. The heater carries a warning symbol to alert the user to the risk of fire that exists if the heater is accidentally covered. Caution - some parts of this product can become very hot and cause burns. Particular attention must be given where children and vulnerable people are present. For your safety, this heater has been fitted with a thermal cut-out. This appliance is not intended for use by persons with reduced physical, sensory or mental capabilities unless supervised. Children should be supervised to ensure that they do not play with the appliance. Cleaning and user maintenance shall not be made by children. Servicing and product repairs should only be undertaken by the manufacturer's approved service agent. Household dust, lit cigarettes, candles and oil burners can cause significant soot deposits to build up on the surface directly above and to the sides of the heater.
- Page 4: Operating warnings Remember to observe all safety warnings and precautions when operating the heater on the automatic or timer modes, either attended or unattended since a fire risk exists when the heater is accidentally covered or displaced. Do not use if the heater’s main power lead is damaged. If the supply cord is damaged it must be replaced by the installer or an approved service partner. Do not cover cord with carpeting, throw rugs, runners, or similar coverings. To reduce the risk of fire, keep textiles, curtains, soft or hard furnishings or any other flammable or heat sensitive material a minimum distance of 1m from the air outlet on the top of the heater. Do not use this heater in small rooms when they are occupied by persons not capable of leaving the room on their own, unless constant supervision is provided. To avoid danger of suffocation or choking please remove all packaging materials particularly plastic and EPS and keep these away from vulnerable people, children and babies. In order to avoid overheating, do not cover or obstruct the heater.
- Page 5: Important safety advice includes precautions for using the product near water and outdoors. Ensure the power cable is intact and not frayed or cut. Avoid leaving the product unattended, especially around small children. Be cautious of overloaded extension leads. Protect the power cable from damage and interference by foreign objects. The product should not be used on slopes or uneven surfaces. Keep it away from fire hazards and naked flames. Chemicals can also damage the unit. DIY repairs are not recommended, and the product should be safeguarded against water exposure.
- Page 6: Sizing options include various wattage levels and product codes. The product codes range from NTL4S 07 to NTL4S 24. Dimensions are provided in millimeters for each wattage option. The weights of the products vary from 3.9 kg to 8 kg. It is important to refer to the rating label on the product for confirmation of the heater's KW output.
- Page 7: Minimum clearances and IP zone requirements must be adhered to. Do not locate the heater immediately below a fixed electrical power point. This heater must not be connected to the electricity supply via an external switching device or circuit that is regularly switched on and off by the utility supplier. Cables/flexes that are supplied pre-fitted to the product must not be extended. The wall bracket supplied with the heater must be used when wall mounting, and the heater must be installed in the correct orientation. The fixings should be used to secure the bracket to the particular wall on which the heater will be installed. The heater should be positioned observing the minimum stated clearances around the heater. When wall mounting, this heater must be mounted on a vertical wall. This product is not suitable for use/installation in drying rooms, cupboards, or similar.
- Page 8: Wall mounted installation Minimum clearance Wall bracket installation steps The wall bracket can be used as a measuring device for placing the heater on the wall. Mark the location for the two bottom screws and fasten the two screws in the wall.
- Page 9: Place the wall bracket onto the bottom screws and fasten it with the top screws. Place the heater on the wall bracket, secure the tilt strap, and click the heater onto the top catches. To secure the heater safely to the wall, fasten the screw on each of the two catches at the top of the wall bracket. Plug the product in and turn on the switch to operate the heater. For heaters intended to be permanently connected to fixed wiring, means for all-pole full disconnection must be incorporated in accordance with the National wiring rules. Electrical installation must only be completed by an authorised electrician. If the power lead is damaged, it must be replaced by the manufacturer’s service agent or similarly qualified persons to avoid a hazard.
- Page 10: Portable installation is only suited for well insulated spaces or occasional use. Ensure the enclosed screw (M3.5x10) is in place on the power supply as shown. Assemble foot onto the frame hole. Align the product with reference to slots provided on frame. Click into place. Fix/press castor wheels into the feet.
- Page 11: Turn the unit on by pressing the On/Off switch to the 'I' position. Press the switch to the '0' position to turn the unit off. Set the temperature by sliding the toggle to the desired temperature. The yellow indicator light will illuminate when the temperature is set.
- Page 12: Cleaning & Storage Over time, dust can accumulate on the heater which can affect performance. It is recommended to clean the unit at least once a month. Turn the unit off and disconnect the appliance from the power supply. Remove any dust build up with a soft brush. Wipe the surface of the unit with a soft damp cloth. Mild detergent can be used for any stubborn marks. The control panel and other parts must not come into contact with water or any other liquids. If not using the unit for an extended period of time, turn the unit off, unplug, and take care of the mains lead & plug. Cover the unit and store it upright in a location where it will not receive direct sunlight. Prolonged exposure to direct sunlight will discolour the enclosure. Do not dispose of electrical appliances as unsorted municipal waste. Use separate collection facilities.
- Page 13: Page 13

aube technologies TH108PLUS Electronic Thermostat User Guide

tuya BHT-005 Wifi Heating Thermostat User Manual

GENERAL HT330S Smart Room Thermostat User Manual

Danfoss AN527449268065en-000101 Thermostat Instruction Manual

GENERAL LIFE NORA 270S Digital Room Thermostat User Manual

aube technologies TH104PLUS 5-2 Day Programmable Electric Thermostat Owner’s Manual

HotWire R220 WiFi Thermostat Instruction Manual

LUX DHP2120 Battery Powered Non Programmable Digital Heat Pump Thermostat Installation Guide

ENGO CONTROLS FAN-24W 24V Fan Coil Thermostat User Guide

Honeywell T6360 Room Thermostat User Manual