Beca BHT-12 Smart Thermostat User Manual

Precautions Before Installation
Default settings for program schedule
Function Features
1. Touch buttons: no need to worry about the buttons being
stuck and not rebounding;
2. Heat and cool dual mode: heating and cooling, one device,
two control modes;
3. Internal and external dual senors; default built-in sensor,
optional external sensor;
4. Heating indication: two working indicator lights on the left and
right, know its working status without coming close;
5. Dual temperature systems: support Celsius-℃ and
Fahrenheit-℉ switching;
6. Various plugs: optional plugs of various specifications, British
standard, European standard, American standard, Australian
standard, and national standard are optional;
7. Convenient control: The advanced options of the thermostat
can be set in the APP, which is more convenient.
8. Intelligent voice: connected to Tmall Genie, Alexa, Google
Assistant, Xiaodu, Yandex, voice control, which frees hands;
9. APP control: The APP supports ios/android system, and the
temperature is updated in real time; automatically obtains the
temperature and humidity, PM2.5 of the local area, and creates
intelligent scenes. It has supported all regions and languages at
home and abroad, and the service is more comprehensive.
Manipulation Instructions
MON.-FRI.
SAT.
1. Before installation, please confirm that the plug type of this
product is suitable for your local standard and heating equipment;
2. Please contact the after-sales service for equipment failure,
please do not try to repair it by yourself;
3. After the installation, please refer to this manual to check again
to ensure normal safety
SUN.
(⑦shows on scteen)
(①②③④⑤ shows on
Time
display
(⑥shows on scteen)
1.Power: Press
to turn the thermostat on/off.
scteen)
8:00~11:30
2.Cooling / Heating mode: This thermostat supports cooling or
heating mode, which can be selected and switched in the APP, or
refer to "Advanced Options Settings".
TIME
TEMP.
20
ON TIME
TEMP.
20
ON TIME
6:00~8:00
TEMP.
20
Period 1
6:00~8:00
6:00~8:00
Period 2 8:00~11:30
Period 3 11:30~13:00
Period 4 13:30~17:00
Period 5 17:00~22:00
Period 6 22:00~6:00
15
8:00~11:30
11:30~13:00
13:30~17:00
17:00~22:00
22:00~6:00
20
8:00~11:30
11:30~13:00
13:30~17:00
17:00~22:00
22:00~6:00
20
3.Manual/Programming/Temporary Manual/Holiday Mode:
15
20
20
Press
in the APP or on the control panel of the thermostat to
15
20
20
switch between Manual/Programming/Holiday mode. Depending on
the mode, the corresponding icon will be displayed at the top of the
screen.
Manual Mode : In this mode, the thermostat controls the device
according to the manually set temperature.
Programming Mode : In this mode, the screen displays the
current programming cycle the thermostat is in, and the thermostat
controls the device according to the weekly programming schedule.
Please refer to point 7 for timetable setting.
Temporary manual mode: In the programming mode, manually
adjust the temperature and enter the temporary manual mode. At
this time, the screen display icon " " will flash, and the thermostat
will execute the current set temperature at this time, and the
temperature will restore during next weekly programming cycle.
22
20
20
15
15
15
8.External sensor data query: long press " " for 5 seconds,
the screen will display the temperature of the sensor data.
If no external sensor is connected, "err" will be displayed
Product Parameters
Advanced Options Settings
Voltage: 95~220V, 50~60Hz
Maximum load: 16A
In the power-off state, long press " " for 5 seconds to enter
the advanced options settings. Press " " to select a function,
and press " " or " " to adjust the corresponding code.
All advanced options settings will take effect automatically
after restarting the thermostat.
Temperature sensing element: NTC10K
Temperature control accuracy: ±0.5℃
Temperature control range: 5 - 90°C, can be changed in advanced
options
Shell material: PC+ABS (flame retardant)
Working environment: 0 - 45℃, 5 -95%RH (no condensation)
Storage temperature: -5 - 55℃
Code
Function
Setting and options
Default
Dimensions and installation instructions
Dimensions: millimeters (mm)
Temperature
compensation
Thank you for purchasing
Holiday Mode
: In this mode, the screen will display the icons
1
2
-9 to 9 ℃
-3
1
Protection class: IP20
Display temperature range: 5~99℃
"
" and " ", and the thermostat will maintain a fixed
Deadzone Temp.
1-5℃
Thank you for choosing our thermostat. We are committed
to bringing together high-end technology, high-quality
production technology, safe and reliable materials to
produce high-quality and low-cost products.
Please read this manual for comprehensive product
information. Also make sure a professional installs the
thermostat and follows all your local regulations.
temperature until the holiday is over. Lasting days of Holiday Mode
can be set in the APP or Or long press " " to enter the clock
setting, then press " " 4 times to enter the holiday mode day
setting, the test screen "RT" will flash..
4.Temperature setting: Press " "/" " to set the target
temperature.
62.0
53.2
35.0
01:All buttons are locked except power button.
01:All buttons are locked.
3
4
Button Locking
Sensor typer
01
AL
Product UI
In: Internal Sensor(to control the temp.)
Ou: External Sensor (to control the temp.)
AL: Internal&External Sensor (Internal sensor to control
the temp., external sensor to limit the temp.)
Week
Heating/Cooling
Energy saving
mode
5
6
Min.Set Temp.
Max.Set Temp.
5-15℃
5
5.Time setting: The Wifi version will automatically synchronize the
time after connecting to the network. Or long press " " to enter
Room temp.
Clock
15-45℃
35
Set temp.
Packing List
00: Display the room temperature and the set
temperature, press the up and down keys to display the
set temperature
Floor temp.
WIFI
Period
the time setting, and press "
" to adjust the value, respectively
Thermostat*1
User Manual*1
QC certificate*1
7
Temperature display
00
set up for minutes, hours, and days of the week ("①" at the top of
the screen means Monday, "②" means Tuesday, and so on) . After
the adjustment is completed, press " " to exit the time setting.
External Sensor 2.5m ( optional)*1
01: Only display the set temperature
External sensor
Programming
mode
Low temp. protection
setting.
Manual mode
8
9
0-10℃
0
About Your Thermostat
High temp. protection
setting.
120.0
25-70℃
50
Clock
6.Child lock
: Press and hold " " and " " at the same time for
Power
Mode
BHT-12 is suitable for electric heating radiator, electric
cooling and temperature control system.It can be used in
smart homes, shopping malls, and industrial places.
Before use, please confirm that this product is compatible
with your temperature control equipment.
5 seconds, the thermostat will enter the child lock mode. You can
also set full lock and half lock in advanced options, please refer to
the description of advanced options below.
10
11
Energy saving Mode 00:OFF
01:ON
00
20
Up/Down
Cool Energy saving
10-50℃
Temp.
Heat Energy saving
10-50℃
7.5+1+1 programming mode setting: wifi version can be set in
APP. In the non-wifi version, long press " " to enter the clock
setting, and then press " " 4 times to enter the programming
mode setting. At this time, the screen displays (①②③④⑤), the
12
26
Temp.
0:Cool Mode
1:Heat Mode
13
14
Cool/Heat
01
00
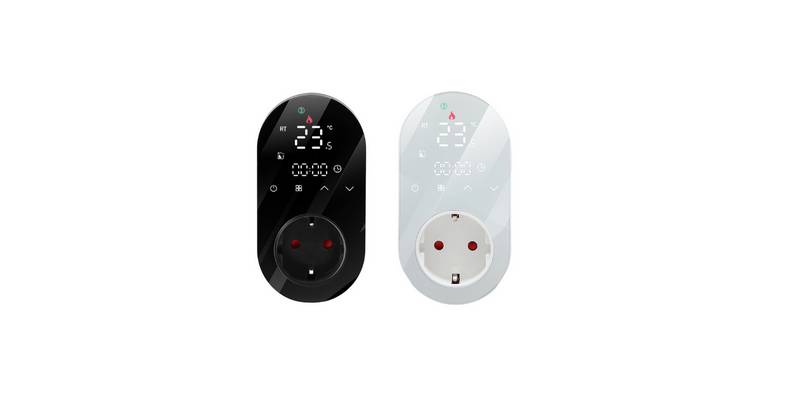
Appearance Features
0: Degree Celsius ℃
1: Fahrenheit ℉
℃/℉
1. Small size: small and flexible, can be installed without a
large space;
2. Classic color matching: pearl white, midnight black, into a
variety of decoration styles;
3. Warm hand feel: curved body, chamfer transition, no hand
cutting;
minute of the time flashes, and the cycle is 1 "
". Then press "
"
"
0-8, when set to 0, after 10 seconds of no operation,
the screen will turn off, press the up and down keys to
wake up
Screen brightness
when no operation
15
1
to select and set the hour, temperature and cycle. Press " " or "
to adjust the corresponding value. After completing the setting, you
need to shut down once to store the data in the thermostat.
16
17
Reset
00: No factory reset; 01: Factory reset
00
Version number
U1

| General | Details |
|---|---|
| Name | Beca BHT-12 Smart Thermostat User Manual |
| Make | BECA |
| Language | English |
| Filetype | PDF (Download) |
| File size | 0.54 MB |


Beca BHT-9000 Thermostat User Guide

beca BAC-005 Series Thermostat User Guide

Beca BHT-6000 Series Round Thermostat User Guide

Beca BAC-1000 Series WiFi Thermostat User Guide

Beca BHT-002 Electric Heating Wifi Thermostat User Guide

Beca BHT-008 Heating Thermostat User Guide

Beca BHT-7000 Smart Knob Thermostat User Manual

Beca BAC-006 Zigbee Thermostat User Guide

Beca BHT-006 Series Thermostat User Manual

Beca BHP-8000 C Room Thermostat User Guide
Beca BHT-12 Smart Thermostat User Manual Overview
Summary of Contents
- Page 1: Precautions before installation Default settings for program schedule Function features include touch buttons, heat and cool dual mode, internal and external dual sensors, heating indication, dual temperature systems, various plugs, convenient control via an app, intelligent voice control, and comprehensive app support. Manipulation instructions emphasize confirming plug type, contacting after-sales service for equipment failure, and checking installation for safety. Manual, programming, temporary manual, and holiday modes are available for temperature control. Advanced options settings allow for voltage specifications, maximum load, temperature control accuracy, and working environment parameters. Holiday mode maintains a fixed temperature until the holiday is over. Product parameters include dimensions, temperature compensation, and protection class. Thank you for purchasing the thermostat, which is designed for high-quality performance and safety. Child lock feature can be activated for added security. Energy-saving mode options are available for both heating and cooling. The thermostat is suitable for various temperature control systems and smart home applications.
- Page 2: About Wi-Fi Wi-Fi connection requires configuration through a smartphone or tablet for communication between connected devices. AP Mode involves pressing and holding the thermostat icon until it flashes slowly. EZ Mode allows for quick setup when the thermostat is off, indicated by a flashing icon on the screen. Download the Smartlife app from the Apple Store or Google Play for account registration and installation. Connect the thermostat by following the tutorial after returning to the Smartlife app. The app operation interface provides descriptions for managing the heating thermostat. Simple exception handling includes checking connections if the power is on but the display is not working. Temperature calibration may be necessary if the room temperature differs from the actual reading. The device comes with a 24-month warranty from the date of purchase, with charges for service beyond the warranty period. Setting functions and options can be done through the app, including quick thermostat pairing.

BEOK TDS23 Wi-Fi Fan Coil Thermostat Instruction Manual

GENERAL LIFE SOLARA 300S Smart Room Thermostat User Manual

Honeywell FocusPRO TH6000 Series Programmable Thermostat Instruction Manual

homematic IP HmIP-eTRV-2 Radiator Thermostat Instruction Manual

BEOK TGT79 Touch Screen Thermostat User Manual

Danfoss VIMCA20F 24V RT Room Thermostat Installation Guide

ST76 Sensi Touch 2 Smart Thermostat Instruction Manual

GENERAL 270 RF Room Thermostat Instruction Manual

GENERAL FH10, FH10S Underfloor Heating Thermostat User Manual

seitron 039790 WiFi WiTime Wall Programmable Thermostat User Guide