Wiser CCTFR6100 Radiator Thermostat Instruction Manual


Wiser Radiator Thermostat
Wiser Heizkörperthermostat
de
en
About this product
Über dieses Produkt
The Wiser Radiator Thermostat (hereinafter referred to
as thermostat) uses integrated temperature sensors
to control the flow of water through a radiator, thereby
regulating the temperature in a room. The target
temperature and switching times are set in the Wiser
Home App.
Der Wiser Heizkörperthermostat (nachfolgend
Thermostat genannt) verwendet integrierte
Temperatursensoren, um den Wasserfluss durch
einen Heizkörper zu steuern und so die Temperatur
in einem Raum zu regulieren. Die Zieltemperatur und
die Umschaltzeiten werden in der Wiser Home App
festgelegt.
!
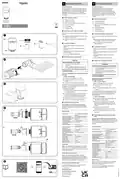
Check package contents
!
Inhalt des Pakets prüfen
A
B
C
D
E
F
Radiator Thermostat
CCTFR6100
CCTFR6101
A
B
C
Heizkörperthermostat
O-Ring (vorinstalliert)
O-ring (pre-installed)
M30 x 1.5 valve adapter and chrome ring nut
Danfoss RA adapter
M30 x 1,5 mm-Ventiladapter und verchromte
Ringmutter
2 x AA battery
D
E
F
Danfoss RA-Adapter
2 x AA-Batterie
Installation guide
Installationsanleitung
“
Removing the old radiator thermostat
Open the valve of the radiator thermostat to facilitate
removal.
“
Alten Heizkörperthermostat entfernen
!
Zur Demontage das Ventil des Heizkörperthermostats
(1) Loosen the ring nut engaged between the valve
adapter and thermostat.
öffnen.
(2) Remove the thermostat and adapter from the
A
(1) Die Ringmutter lösen, die sich zwischen dem
Ventiladapter und dem Thermostat befindet.
valve.
C
(2) Den Thermostat und den Adapter vom
§
Inserting the batteries
Ventil entfernen.
E
F
•
When inserting batteries, observe the correct
polarity.
D
§
Die Batterien einsetzen
•
Dispose of the batteries according to statutory
regulations.
•
Beim Einsetzen der Batterien auf korrekte Polarität
achten.
B
•
Used batteries must not be placed in normal
household waste.
•
Die Batterien gemäß den gesetzlichen Vorschriften
entsorgen.
•
Do not use rechargeable batteries.
•
Verbrauchte Batterien gehören nicht in den
Hausmüll.
$
Install the adapter and thermostat
•
Keine aufladbaren Batterien verwenden.
„
NOTICE
$
Adapter und Thermostat montieren
RISK OF DAMAGE TO EQUIPMENT
•
Do not use tools, such as pliers, for
installation.
HINWEIS
GEFAHR DER BESCHÄDIGUNG DES GERÄTS
•
Make sure that the O-ring is seated firmly on
the thread. Tighten the ring nut by hand only.
•
Für die Montage keine Werkzeuge wie z. B.
Zangen verwenden.
(2)
Failure to follow these instructions can result in
equipment damage.
•
Der O-Ring muss fest auf dem Gewinde
angebracht werden. Die Ringmutter nur von
Hand anziehen.
Follow the installation steps for the type of adapter
you have.
Bei Missachtung dieser Anweisungen besteht
Beschädigungsgefahr.
(1)
a. M30 x 1.5mm adapter
(1) Place the valve adapter on the valve.
Befolgen Sie die Montageschritte für den
jeweiligen Adaptertyp.
(2) Loosely screw the ring nut onto the valve
adapter.
a. M30 x 1,5 mm-Adapter
(3) Screw on the thermostat and hand tighten.
(1) Den Ventiladapter auf das Ventil setzen.
§
To set the LEDs in the desired position: slightly loosen
the ring nut, turn the thermostat to the desired position
and tighten the ring nut again.
(2) Die Ringmutter locker auf das Ventil
schrauben.
(3) Den Thermostat anschrauben und von Hand
b. Danfoss RA adapter
anziehen.
(1) Push the Danfoss adapter over the narrow end
So bringen Sie die LEDs in die gewünschte Position:
Die Ringmutter etwas lösen, den Thermostat in die
gewünschte Position drehen und die Ringmutter
wieder festziehen
of the Danfoss valve.
(2) Turn the Danfoss adapter until the grub screw
hole is on the the opposite side to where you
want the thermostat LEDs to be positioned.
b. Danfoss RA-Adapter
(3) Tighten the grub screw with a 2 mm Allen key.
(1) Den Danfoss-Adapter über das schmale Ende
(4) Screw on thermostat and tighten by hand.
des Danfoss-Ventils schieben.
(2) Den Danfoss-Adapter drehen, bis sich die
Bohrung der Madenschraube gegenüber der
gewünschten Position der Thermostat-LEDs
befindet.
%
Read full device guide online
Scan the QR code and choose your language
for complete information about the device, including
operation, configuration and using the product with a
Wiser system.
(3) Die Madenschraube mit einem
Innensechskantschlüssel (2 mm) anziehen.
(4) Den Thermostat anschrauben und von Hand
festziehen.
$
a.
(2)
(1)
Technical data
Power supply:
2x 1.5 V IEC LR6 (AA) alkaline
batteries
%
Vollständiges Handbuch zum Gerät online
lesen
Without power supply:
Temperature setting range:
Temperature resolution:
Control accuracy:
Connection data are retained
5 °C - 30 °C
Scannen Sie den QR-Code und wählen Sie Ihre
Sprache aus, um vollständige Informationen über das
Gerät zu erhalten, einschließlich Betrieb, Konfiguration
und Verwendung des Produkts mit einem Wiser-
System.
0.5 °C
< 0.8 °C at 4 °C/h
Surface temperature at place max. 93 °C
of installation:
Water temperature:
max. 110 °C,
max. continuous 73 °C
Technische Daten
Ambient operating
temperature:
0 °C to 45 °C
b.
(1)
Stromversorgung:
2 x 1,5 V IEC LR6 (AA)
Alkalibatterien
Storage temperature:
-20 °C to 65 °C
2.4 GHz
Operating frequency:
Ohne Stromversorgung:
Verbindungsdaten werden
beibehalten
Max. radio frequency power
transmitted:
max. 20 mW (13 dBm)
Temperatureinstellbereich:
Temperaturauflösung:
Regelgenauigkeit:
5 °C ... 30 °C
0,5 °C
Degree of contamination:
Radio range:
2
30 m free field
IV - 2%
A
< 0,8 °C bei 4 °C/h
max. 93 °C
Energy class:
Oberflächentemperatur am
Montageort:
Software class:
(2)
Protection rating:
Dimensions (HxØ):
IP 30
Wassertemperatur:
max. 110 °C (Spitzenwert),
max. 73 °C (dauerhaft)
93 x 51 mm
(3)
Betriebsumgebungstemperatur 0 °C bis 45 °C
Trademarks
Lagertemperatur:
-20 °C bis 65 °C
2,4 GHz
Wiser™ is a trademark and the property of Schneider
Betriebsfrequenz:
Electric SE, its subsidiaries and affiliated companies.
Max. übertragene
max. 20 mW (13 dBm)
Funkfrequenzleistung:
Other brands and registered trademarks are properties
of their relevant owners.
Verschmutzungsgrad:
Funkreichweite:
Energieklasse:
2
30 m Freifeld
IV - 2 %
A
EU Declaration of Conformity
Softwareklasse:
Schutzart:
Hereby, Schneider Electric Industries, declares
that this product is in compliance with the essential
requirements and other relevant provisions of RADIO
EQUIPMENT DIRECTIVE 2014/53/EU. Declaration of
conformity can be downloaded on: se.com/docs.
IP30
Abmessungen (H x Ø):
93 x 51 mm
Markennamen
Wiser™ ist eine Marke und Eigentum von Schneider
Electric SE, dessen Tochtergesellschaften und
verbundenen Unternehmen.
%
Schneider Electric Industries SAS
If you have technical questions, please contact the
Customer Care Centre in your country.
Andere Marken und eingetragene Marken sind
Eigentum der jeweiligen Inhaber.
se.com/contact
UK Representative
Schneider Electric Controls
401 Southway Drive
Plymouth, PL6 6QT
United Kingdom

| General | Details |
|---|---|
| Name | Wiser CCTFR6100 Radiator Thermostat Instruction Manual |
| Make | Wiser |
| Language | English |
| Filetype | PDF (Download) |
| File size | 0.77 MB |


Wiser CCTFR6400 Room Thermostat User Manual

Wiser CCTFR6100 Radiator Thermostat Instruction Manual Overview
Summary of Contents
- Page 1: About this product The Wiser Radiator Thermostat uses integrated temperature sensors to control the flow of water through a radiator, thereby regulating the temperature in a room. The target temperature and switching times are set in the Wiser Home App. Check package contents Radiator Thermostat O-ring (pre-installed) M30 x 1.5 valve adapter and chrome ring nut Danfoss RA adapter 2 x AA battery Removing the old radiator thermostat Open the valve of the radiator thermostat to facilitate removal. Inserting the batteries When inserting batteries, observe the correct polarity. Dispose of the batteries according to statutory regulations. Do not use rechargeable batteries. Install the adapter and thermostat Do not use tools, such as pliers, for installation. Make sure that the O-ring is seated firmly on the thread. Tighten the ring nut by hand only. Technical data Power supply: 2x 1.5 V IEC LR6 (AA) alkaline batteries Temperature setting range: 5 °C - 30 °C Control accuracy: < 0.8 °C at 4 °C/h Ambient operating temperature: 0 °C to 45 °C Protection rating: IP 30 EU Declaration of Conformity Schneider Electric Industries declares that this product is in compliance with the essential requirements and other relevant provisions of RADIO EQUIPMENT DIRECTIVE 2014/53/EU.
- Page 2: Indice de protection : IP 30 Dimensions (HxØ) : 93 x 51 mm Schneider Electric Industries déclare que ce produit respecte les exigences de la directive sur les équipements radio 2014/53/EU. La déclaration de conformité peut être téléchargée sur se.com/docs. Le thermostat de radiateur Wiser utilise des capteurs de température intégrés pour contrôler le débit d’eau dans un radiateur. La température cible et les heures de commutation sont réglées dans l’application Wiser Home. Vérifier le contenu du package : thermostat de radiateur, joint torique, adaptateur de vanne, adaptateur Danfoss, 2 x batterie AA, guide d’installation. Lors de l'insertion des batteries, respecter la polarité correcte et ne pas jeter les batteries usagées avec les déchets ménagers. Ne pas utiliser d’outils tels que des pinces pour l’installation et s'assurer que le joint torique est installé correctement. Caractéristiques techniques : alimentation par 2 piles alcalines 1,5 V, plage de réglage de la température de 5 °C à 30 °C.

GENERAL Life MITRA 250 Digital Room Thermostat User Manual

homematic IP HmIP-eTRV-2 Radiator Thermostat Instruction Manual

MI-HEAT E51 Thermostat User Manual

GENERAL HT250 Digital Room Thermostat User Manual

Honeywell TH5220D Non-Programmable Digital Thermostat Installation Guide

emos P56211 Wireless Room Thermostat Instruction Manual

vivint VS-ZGBTHERM-001 Smart Thermostat User Guide

RTH21 Programmable Thermostat Coldbuster Dual Instruction Manual

BEOK TDS23 Wifi Thermostat Owner’s Manual

Blue Universal OH-1202 Touchscreen Thermostat Instruction Manual